|
|
|
|
Ovals and various "egg shaped" designs
are often used in marquetry, especially for such purposes as
framing marquetry portraits in a similar manner to the ovals cut
in mount board as done by photographers. But, you may ask, how
do I actually draw out such a design in the first place? Well,
never fear, because I am about to guide you through the process
of drawing all manner of such designs. So, are you ready? right
then, off we go:
I am now going to describe to you a few
of the alternative methods used for the construction of an
ellipse and various ovals. No part of an ellipse is an arc,
which is part of a circle, and so a true ellipse cannot be drawn
with a compass. I have always used the trammel method described
by Eddie Stevens in Journal No. 219.
I thought the string method too big and
clumsy for marquetry purposes, and more suitable for setting out
flower beds. However, on trying it I found that it was not
difficult to get a good result.
Here is the method: -
|
|
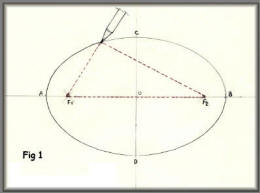
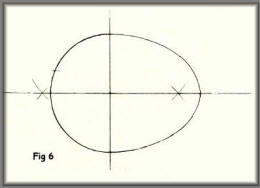
Draw the long and short centrelines,
crossing at 0 and mark the extremities A,B,C, and D, Open the
compass to AO and with point on D, draw arcs to cut line AB at
points F¹ and F², called the focal points. Make a "string loop"
- I used button thread; with length from F¹ to B. I found the
easiest way to do this was to cut a piece of veneer, say about 1
inch wide, length F¹ to B and tie the loop around it. Put a
small nail or suitable pin (I used a drawing pin which could be
pushed through from behind) at each focal point, and now use the
loop as shown in the sketch - using a sharp pencil to describe
the circumference of the ellipse.
By ellipse we mean a true ellipse as
obtained by the trammel method. By oval, we mean a near or
approximation drawn with a compass.
|
|
|
The method of construction of an oval
(which in my experience has been the most common) is as
follows;
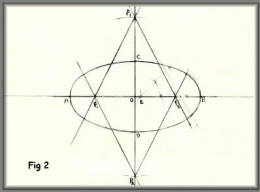
Draw a line A B (Fig 2) equal in length
to the long diameter of the oval, and through the middle point O
of this diameter draw a line at right angles. Make O C and O D
each equal to half the small diameter of the oval. From A mark
off A E equal in length to C D. Divide E B into three equal
parts. Now set the compasses at a radius equal to two of the
parts, and with O as centre, mark points F1, F2. Then with O
again as centre, and the compasses set to length F1 (F2), mark
points P1, (P2). It will be seen that either O P is equal to
four of the parts into which E B has been divided. The points F
and P will be centres from which the arcs will be described.
Join P1 to F1 F2, and P2 to F1 F2 and produce the lines through
as shown in figure 2. Now with centre F2 and radius F2 B
describe the end arcs, and with centre P and radius P2 C
describe the side arcs. If carefully and properly drawn, the
arcs should meet and run into each other on the lines drawn
through P and F. The object, indeed, for which these lines are
drawn is to determine the meeting points of the curves. It
should be noticed that the points P may come either within or
without the figure, according as the oval is broad or narrow.
|
|
|
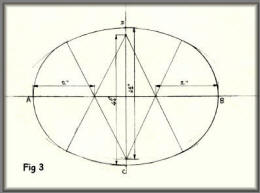
This method is to calculate the required
radii. The oval shown is 6 inches by 4½ inches.
The radius for the sides equal 8 times the long diameter minus 5
times the short diameter and divide the remainder by 6.
This equals (8AB – 5CD) ÷ 6 = (48 - 22½)
÷ 6 = 4¼"
The radius for the ends equals 4 times
the short diameter minus the large diameter and divide by 6.
This equals (4CD – AB) ÷ 6 = (18 – 6) ÷
6 = 2"
Lines may be drawn as in sketch 2 to
give the exact point of contact of the curves, but with care in
drawing any slight discrepancy can be put right using a French
curve.
|
 |
|
Draw the major and minor axes,
intersecting at O. On one half the major axis draw an
equilateral triangle OEA on OE mark off OP equal to OC. From C
draw through P to find point Q. Then from Q draw QR parallel to
OP. With centre R draw CQ. F¹ is the centre of the arc QA. For
the opposite arcs, make OF² equal to OF and BP equal to AF².
A word about triangles.
An equilateral triangle, 3 sides of
equal length and three angles of 60 degrees.
An isosceles triangle has 2 sides of
equal length.
A scalene triangle has three sides all
of different lengths.
|
 |
|
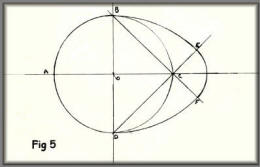
This is a simple method of drawing an
egg shaped oval, but with the drawback that whatever the size of
the oval, the ratio of the long axis to the short axis will
always be the same (because radius OB will always be twice
radius OA).
First, draw the circle ABCD.
With centre D and radius DB draw arc DF.
Draw lines BF through C and DE also
through C.
Now with centre C draw arc EF.
|
 |
|
This is simply a combination of a semicircle and a half ellipse
drawn by the trammel method. |
 |
|
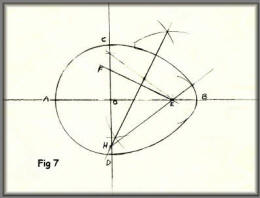
This is a relatively simple method of
constructing an egg-shaped oval to choose the length and also
the small end radius.
First, draw the major and minor axes AB
and CD intersecting at O. Now draw the semicircle for the large
end then B to be at the small end, length OB to suit your
requirements. Now mark point E so that EB will be the small end
radius that you require. Mark point F on the minor axes so that
FC = EB, then draw a perpendicular bisector FF to cut OD at H.
(H could be outside the oval depending on what dimensions you
have chosen - simply extend OH to suit). Now with centre H draw
Arc CG, and E is the centre for arc GB.
|
 |
|
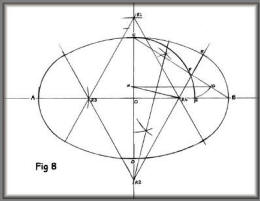
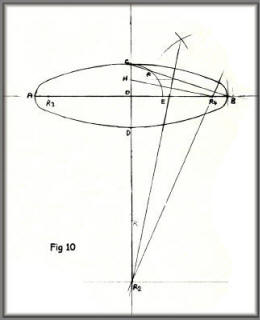
When the major axis is considerably
longer than the minor axis, say 4 to 1, all the foregoing
methods are not so satisfactory, but for general purposes this
method, though not as simple, is workable for all proportions
long or broad.
Draw the major and minor axis AB and CD,
intersecting at O. Join CB. With centre O and radius OC, draw
arc CE, cutting line CB at F. With centre F and radius FE draw
arc EG. Draw GH parallel to OB. With compass point on B, make
BR4 equal to CH. Join HR4. Bisect HR4 and extend the
perpendicular bisector down to meet CD extended at R2. Then R2
is the centre for the side arc and R4 is the centre for the end
arc. Make OR3 equal to OR4 to give the centre for the opposite
end arc.
|
 |
|
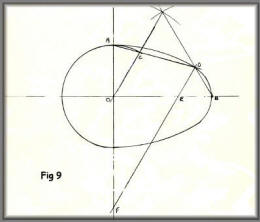
A variation on figure 7 above.
This variation is a little more extended
than the ones shown in figure 7.
The method of construction is the same
however.
|
 |
|
A variation on figure 8 above.
The variation you see in this diagram is
that the oval is considerably more flattened than the one seen
in figure 8.
You can vary the shape and outline to
fit in with your own design by following the guidelines given in
the text next to figure 8.
|
 |
|
The design methods shown above will give
you accurately defined shapes as seen in the ten examples I've
included here. You can scale the designs quite easily to fit in
with your needs.
Do have a go yourself, you will find
it's much easier than you think to draw accurate ovals.
|
|
Tutorials Menu
|
|

