|
Marketing Marquetry by David Walker |
|
|
Welcome to the first Newsletter for the Group. Hopefully
I will try to produce a letter twice a term. I hope to
include dates of interest, hints and tips to help you with
your Marquetry and general chit chat. I would appreciate any
items that you would like to share with the other members.
If you have anything you would like to appear in the letter
please let me have it so that I can build up a store of
material.
Thank you. David Walker The Redbridge Marquetry Group was formed after the East London Group closed in 1979. We still have a few of our founder members with us. Alf Murtell, Ken Daniels, Tom Brewer and Horrie Pedder still faithfully turn out week after week and form a firm backbone of our Group. I read recently the article that Alf, who was then Group Secretary, wrote for the Marquetarian in the Spring of 1979. He stated that “33 members have joined, of which 6 are new members.” Since then the numbers attending the Group have fluctuated sometimes only a dozen on a poor night but on one momentous occasion after the first Chigwell Show we had nearly 60 turn up! Attendance always depends on the weather and inclement weather puts off all but the keenest. However our numbers still average out between 25 and 35 which is not much different than in 1979. One of the main problems that the leadership have to face is, why do some new members fail to stay, disappearing after only a short time. Is it lack of attention? Lack of progress? or what? If you have any ideas that would prevent this drop off, please mention it to one of the Committee. HINTS AND TIPS If you
are anything like me, when it comes to the finishing of a
picture you will tend to lose interest rather quickly! The
finish will make or break a picture. You will have spent many
weeks, if not months, carefully cutting your picture and have it
well mounted only to become disheartened when you try to get an
acceptable finish. Let me say right now that the finish is what
you are happy with. It doesn’t have to be mirror like although
most judges would appear to fancy such a finish (When did you
see a matt wax finished picture win a prize at the National?)
I have yet to finish a picture to my complete satisfaction. Here
are a few suggestions that I would make which you could consider
next time you come to this stage. You cannot start to apply
your finish, no matter what it consists of until you have got a
super-flat, dust free surface. Once your picture is mounted
clean off all the residual glue and veneer tape with a scraper.
A piece of curved broken glass suitably protected with veneer
tape at the ends is very suitable but scrape with care just
remove the glue and tape. Once clean sand with abrasive paper
until you can rub your fingers over the veneer surface and not
feel any undulations. Again sand with care as you are sanding
very thin veneer. Sand in the direction of the majority of the
grain with the abrasive paper wrapped around a cork sanding
block. I’ve lost count of the number of pictures I have spoilt
at this stage by rubbing though to the glue so take care. On
paler woods the first signs of this dreaded problem is a very
slight discoloration of the white veneer. If you don’t stop
immediately you will rub right though. Once you are satisfied
rub the surface with a damp lint free cloth. Do not soak,
just damp and let dry. This has the effect of raising very
slightly the grain. When completely dry, this should be only a
few minutes, finish sanding with a very fine (800 grit or more)
abrasive paper. Sand lightly to get perfectly smooth and try to
keep at least two thirds of the sanding block on the picture.
Sand the edges carefully keeping the block at right angles to
the edge. Once you have finished you should be ready to apply
the finish. - Continued in the next issue.. Your Officers, elected at the last AGM were (in 1997):-
The above page was taken from the file copies of our Redbridge group's very own publication "Marketing Marquetry" which was edited by Dave Walker. Over the years of its production Dave managed to get hold of some terrific articles for inclusion in the publication, especially notable are the ones by Eric Horne from when he was a member of our group. |
|||||||||||||||||||||||||||||||
|
Welcome
to the second Newsletter for the Group. On behalf of the
committee members I hope you all had a very pleasant Christmas
and wish you a happy New Year. During the holiday I hope you had
plenty of time to relax especially over your cutting board!
Thank you for your loyal support during the past year, we on our
part will do all we can to promote both the Group and the craft
of Marquetry in 1997. David Walker. Since producing the last Newsletter we have had some new members join us. It is always good to have new blood if we want to keep the Group as a viable entity. As I mentioned before we have no idea why sometimes very promising beginners suddenly give up. Please let us know if you have any ideas that will help keep them. We have been looking without success just recently for original photographs or line drawings that we could use to make simple kits. When we display and demonstrate at various locations it is very useful to be able to offer for sale such kits. They are a cheap way of getting people interested in Marquetry and provide much needed finance for the Groups financial balance. The weekly subscription is very low compared with other craft type clubs, groups and evening classes elsewhere and it has been kept low partly by income gained from these sales. With the new copyright laws we cannot use pictures or line drawings in kits, that we offer for sale which are the work of or owned by an other person without authority. So how about it? Have a hunt around in your old photo albums or if you have artistic talent see if you can produce a line drawing that a beginner would not have too much difficulty making a picture from. HINTS AND TIPS Finishing a picture (continued) Continuing from last issue on the subject of finishing, having sanded the picture with varying grades of glass paper and produced a smooth flat surface we are ready to apply the finish. The first question arises is what polish do I use. Finishes are multiple and varied. As I mentioned last time I have yet to find one that I am totally happy with. At the moment I am using Rustins Plastic Coating. This gives an excellent finish but is very pungent. Cellulose sanding sealer can be used to build up an acceptable finish but again you will not win any friends if you use it in the living room. There are lacquer sprays which can be bought from Car Spares shops and some people have obtained excellent finishes with these. French polish is another finish which if applied properly will give beautiful results. I could go on and on but suffice it to say if you find one that gives you acceptable results then stick with it. Many long hours spent in cutting a picture can be lost by hurried finishing. You cannot take shortcuts. I don’t intend at this stage to give advice on the application of different polishes. I will pass on some general hints that I have picked up over the years. Perhaps in future issues some other members of the Group will put pen to paper and describe how they apply their finish. To start with it is best policy to fill the grain. I normally use cellulose sanding sealer applied with the fingertip by small circular movements until the whole picture is covered. (If you are using a new type of polish always try the sealer and finish on another piece of wood first to see if there is a chemical reaction indicating that the two were incompatible.) Also, when using any polish that is cellulose or spirit based, ensure that the room is well ventilated. Sanding sealer if applied thinly will dry very quickly and I usually put on six coats with about 20/30 minutes between. I lightly sand with a worn out piece of glass paper between each coat to remove any nibs or dust specks. I then leave it for two or three days to really harden. Please note: This article follows on in the next issue. The above page was taken from the second issue of the Marketing Marquetry news letter. |
|||||||||||||||||||||||||||||||
|
The next stage is
to sand back until all hollows and finger marks are removed. As
before, use a fine glass paper and use long strokes in one
direction keeping at least three quarters of the block on the
picture. Don’t press too firmly otherwise you run the risk of
inserting deep scratches which may be difficult to remove. To
check if the surface is truly flat hold the piece up to the
light and look across it. Any bright spots are high spots and
need to be flattened to ensure a totally flat surface. During
this period of grain sealing you may find that you start getting
coloured dust beginning to appear. This means that you have cut through your sealer and are starting to sand veneer. If this happens, stop sanding, dust down thoroughly and apply more sealer to the whole face and repeat the process. Until you have a uniformly flat surface that is not showing ‘dips and hollows’ application of your favoured finish will ultimately prove to be time wasted and you normally end up sanding right back. So it is worth the effort in getting it right first time off. (I know, I’ve been there, on nearly every picture that I’ve finished!) Once you are satisfied you are then ready to apply your top finish. As stated, I use Rustins Plastic Coating. It can be applied with a brush quite thickly and any brush marks tend to disappear as the lacquer finds its own level. It also dries fairly quickly allowing second and further coats to be applied more readily. I’ve found it produces a flat acceptable finish which can be polished to a high gloss mirror finish or to any other degree of shine with wire wool. It is a very resilient and hard finish which will take heat if using on a table or tray. If the piece is not going to take direct heat, consider using Rustins Plastic Coating ‘F’ which is the same but without the ‘Melamine’ which gives the other heat resisting properties. If a quantity of either is mixed up in a jar and you wish to keep it to apply later, keep your brush in the jar and enclose both in a plastic food bag and secure tightly. Put this in another airtight food bag and knot tightly. This can be kept in the fridge or other cold place until ready for use. On the down side, ordinary Plastic Coating is quite expensive and must be applied in a well ventilated room. Be careful if storing in the fridge. Make sure the jar is securely and tightly sealed. If not you can wave bye-bye to the contents of the fridge and relationships tend to suffer!If using ordinary Plastic Coating mix four measures of lacquer to one measure of hardener in a glass, not plastic, jar. Make sure it is well mixed by shaking and let it stand to allow any bubbles to settle and disappear. (If using ‘F’ type the ratio is 1:16) I apply the finish on my bench with a newspaper underneath to catch any drips with the piece bluetacked to the top of a 3lb jam jar filled with water or sand to give it weight. This allows you to coat the edges as well. In this way, when you eventually do the back, you can give the edges some more reducing the risk of sanding through later. Whatever method you use make sure that the piece is on an even keel by placing a spirit level over it in both directions otherwise you will find that the lacquer will slowly run to one side. Use a soft fine bristled paint brush, well loaded, and apply in one direction from edge to edge over the whole piece. The drying of each coat depends on the amount of hardener used as it is a chemical process and does not overly rely on a warm temperature. When dry, any time between a half to one and a half hours, lightly rub with a fine or worn out glass paper to remove any hairs, bubbles or dust nibs and apply another coat. The number of coats used depends on the initial flatness of the picture but I have found that I have managed with between four and ten. After each sanding ensure no dust remains before re-coating otherwise the dust specks will show, especially against darker veneer. These can only be removed by sanding back to the previous layer. Once you are satisfied with the flatness of the final finish leave it to fully cure. Although apparently hard on the outside underneath it is probably still soft. (A number of us have sent pieces to the National wrapped in bubble plastic and found that on arrival the bubbles of the plastic have marked the finish because insufficient time was allowed for it to cure. Therefore don’t leave the finishing until the last minute before sending to an exhibition.) The exact time of curing cannot be stated but depends on the mix, temperature and number of coats but I usually leave it for two weeks before finally rubbing down. The final rubbing down can make or spoil your picture. Don’t use a coarse glass paper. This will put scratches into the finish that will be difficult to remove. With Rustins P.C. a wet and dry paper wetted in soapy water works very well but be careful it is very easy to rub through the layers of lacquer. (Again, how many of us have rubbed through to the wood and have had to start again?) Employ the same method as before and ensure that two thirds of the block remains on the picture. Only sand in one direction and increasingly use finer and finer wet and dry paper (I end up with 1200 grit) until the surface is flat and without scratches. Once satisfied, use the burnishing cream supplied, T-Cut or similar medium to obtain the required degree of shine. Wire wool Grade 0000 is very useful for the final finish if a high gloss is not required. This just takes the edge off the high gloss shine. Finally, polish with a good wax polish to complete your finishingFinishing is not easy and is time consuming but if you persist you will find that your pictures will be enhanced as you acquire the necessary skill. It has been mediocre finishing, not poor marquetry that has prevented us winning more often in our inter group competitions with Bexley and St. Albans. Let’s try to alter this next year This has been a long article but I hope it helps and if you have any comments or would like to tell others how you apply your finish let me know and I will use any such article’s in future issues. BUCKLED VENEERS We’ve all got buckled veneers in our stock and they can be particularly difficult to use. Horrie Pedder handed me the following recipe to help straighten them out.2 measures of ‘Cascomite ‘ glue powder, 1 measure of Plain Flour, 3 measures of Water, 1 and a half measures of Glycerine and 1 measure of Methylated Spirits.Mix this concoction together, Brush over the buckled veneer and leave for 5 minutes. Then place between plastic sheets and press with weights until dry. This will flatten out the wood and any residue left will be sanded off during the finishing stage. This is also a good method to use on particularly brittle veneer to stop it splitting prior to cutting. (I’ve not used this method so I don’t know how long the residue will keep in a sealed container.) That page you've just read is page two of the second edition of the Marketing Marquetry news letter. As you see, these pages are packed with useful marquetry information. We hope you enjoy them |
|||||||||||||||||||||||||||||||
|
SID & TONY MAKE IT A FIRST AT THURROCK Congratulations to Alan Mansfield who has won a "First" in the Beginners section of the first National Competition that he has entered with his picture "East Cheam's Finest Sons". His portrait of Sid James and Tony Hancock was also awarded the 'Gladys Walker Award' for the best Beginner picture. Many who attended thought it also deserved the 'Horrie Pedder Award' too. Perhaps next year! The picture drew a lot of attention and whilst I was there always had a number of people viewing it. Well done Alan. We look forward to your next picture with anticipation. Congratulations also to Bill Kober for his Highly Commended Award in the Advanced Section for his Tiger picture "Look me in the eye" (That's you up in the Premier Class now Bill, Well done.) The only other picture that was entered from Redbridge was Bill's other picture, 'Another Hoe Down'. For a Group that has marquetarians of the highest quality this is rather a poor show. Let's see if we can enter more next year. Start selecting your pictures NOW, don't leave it until the end of the year before you start cutting. Only Society members can enter. If you are not a member, see Roy or Dave for details. By joining you are helping the Society to promote the craft of Marquetry. Many people first get interested through the National. There will be no meetings on:- 28th May. Last meeting of the Spring Term will be 21st May. Summer Term - 4th June - 23rd July GROUP COMPETITION Our Group Competition was held in February. There was a total of 17 entries! This is the lowest number I can remember. There were only two entries in the Beginners and Applied. One each in the Intermediate and Miniatures, Three in the Advanced and Seven in the Premier Class. There were no entries in the Three Veneers at all. Quite frankly, and I speak to myself here, this was a poor showing for a Group with as many members as ours. I know that competitions are not the be all and end all of marquetry but it should engender a bit of healthy competitiveness amongst members. Let's see if we cannot better this performance next year. Alan Townsend judged the entries and his comments on the 'Redbridge Finish' were quite encouraging. He stated that the general quality of the finish had improved quite a lot since he last saw us. Well done.
|
|||||||||||||||||||||||||||||||
|
MOUNTING A PICTURE As I mentioned in the last issue I will reproduce an article that Eric Horne produced for the Marquetarian some time ago on Mounting a Picture. The article itself was eight pages long so I will not be able to reproduce it in one go but it is a skill that needs to be mastered to produce a satisfactory finish after the hours of cutting. The article will include tools required, preparing the baseboard, fixing stringers and borders, edging, backing and laying the picture ready to finishing. As with my previous hints on finishing there is more than one way to mount a picture and this is just one. Other methods may differ slightly but you will find your own method through experience. TOOLS The tools required are few, a carpenters set square, a (preferably) metal straight edge, ruler, HB Pencil, knife, veneer tape and glue. An accurate carpenters square is an expensive item ask at the Group and you might be able to borrow one. Again a good straight edge is costly but aluminium channel for fixing shelving makes a very accurate and cheap substitute. PREPARATION The picture must be square. To ‘square’ a picture first ensure one edge is cut straight with your straightedge. Mark the picture to size with a pencil (don’t press too hard) and use the marks with the square to cut to size. Keep your knife upright when cutting so that the edges of the picture are at right angles and be careful when coming off at the bottom. Lower the blade and make a separate cut through the edge. Then finish the cut. By doing this you will prevent splitting along the grain as the blade comes off the veneer. Next, carefully, remove any protective paper from the edges and back of the picture. Your picture is now vulnerable to damage so be careful. Now decide if you want borders and/or stringers. The borders should be cut from a straight grained piece of wood unless another effect is required. Cut the borders at least a quarter inch wider and at least one inch longer than required THE BASEBOARD Medium Density fibreboard is the most suitable baseboard. It cuts and planes easily, is light and does not warp. Multi-ply and chipboard can also be used but have their own problems Ensure that one edge is perfectly straight then mark the board to the size required with the square. Cut and plane the board to the correct size. If you haven’t the tools ask someone at the Group to assist you. The size should be such that the overall size of the finished picture with borders and stringers attached allows for at least a quarter of an inch overlap all round. Take particular care, as with the picture to ensure 90o corners and flat straight edges. FIXING STRINGERS TO THE BORDERS Stringers are lengths of wood that normally come in metre lengths and in various widths and colours. Attached to the border between the picture the can enhance the overall effect. If using more than one length ensure that each length is the same width as even minuscule differences will show up where they mitre. Carefully apply a ribbon of glue to the edge of the border and wait a short while for it to become tacky. Hold the border flat on your cutting board or other flat surface, bring the stringer into contact with the glued edge and press together along the whole length. It’s a good tip to have some strips of veneer tape or lo-tac sticky tape handy to hold the stringer to the border once the whole length is stuck. Before sticking them together, if the stringer is thicker than the border veneer make sure the flatter of the two sides are placed on the base board. Don’t attempt to flatten the stringer until later when along with the border it is stuck to the base board otherwise damage can be done. Next edition; laying the picture onto the base board along with the ends, sides and back. |
|||||||||||||||||||||||||||||||
|
EDITORIAL Well here we are, summer is just a memory and we are well into autumn. People are talking about Christmas. The National is just around the corner! Well it is if you want to enter something. Last year we celebrated Alan Mansfield’s win at Thurrock. Will Alan or anyone else come up trumps next year? The answer to that question has got to be ‘No’ - unless you enter something. Now is the time to start planning at least one picture. I speak to myself here as well. It takes time as we all know to choose, cut and finish a picture. There is nothing worse than finishing a picture with the National only two or three weeks away. Polish does not get time to harden properly and often gets marked in transit spoiling an otherwise potential winner. So how about it. Spend some time looking for a suitable picture. Every year Roy reminds us that each and every one of us is able to enter something . Let’s see if we cant enter more than we have on previous year and show the Marquetry Society that Marquetry is alive and well in Redbridge. Don’t forget that you can only enter if you are a member of the Marquetry Society. We don’t insist that such membership is a condition of joining R.M.G. but by joining you are supporting the cause of Marquetry. Roy has information and details of membership. Our numbers have been low of late. Please remember that our continued meeting at Beal School is very much dependant on being able to collect weekly subscriptions, enough to cover the hire of the room.
We will soon have to vacate
our present room because of the new building and other
alterations. We will be given another room, but where we cannot
find out yet. Watch this space. GROUP COMPETITIONS Our Inter-Group Competition to be held in November with St Albans has had to be rescheduled for next March/April. This was because we could not get a group of rooms together near the dining hall. St Albans were happy to postpone it because they like us had limited entries for each Class. We would each find ourselves entering pictures that didn’t fully represent the quality of either Groups. They have agreed that for the Competition we will both be allowed to draw on the results of both this years and next years competition. So again lets see if we can enter work in as many Classes as we can. This applies to our own Competition as well. Remember, it is the first three winners in each Class that will represent our Group in Competitions with St Albans and Bexley. Here are the Classes that you could enter:- Beginners, Intermediate, Advanced,
Premier, Miniature, Three veneers, Applied. I hope to get Alan Townsend from Chelmsford along to demonstrate various techniques in marquetry. He was going to come at the beginning of the Autumn term but family illness prevented him coming. He hopes to be able to make it before Christmas. Those of you who have never seen his work or watched him demonstrate should make a point of coming. Even experienced marquetarians will learn something from him, his accuracy of cutting is something to be universally admired. This page is re-printed from the pre-Christmas 1997 edition of Marketing Marquetry and was published before we moved in to the rooms we now occupy. It's interesting to take note of the above editorial because it highlights a problem that occurred with one of the Redbridge entries to this year's National. It goes to show how much wisdom the authors put into this publication. |
|||||||||||||||||||||||||||||||
|
MOUNTING A PICTURE
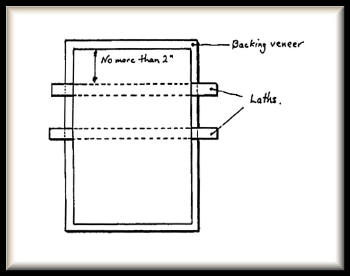
LAYING THE PICTURE ONTO THE BASE BOARD ALONG WITH THE ENDS, SIDES AND BACK. Although the back of your picture in a competition will not be judged, having a nice finish on the back as well as the ends, sides and front gives a nice touch to the finished article As with other aspects of marquetry there is no correct way of covering the base board but the sequence that most marquetarians use is the BEST method! Think Best, Ends, Sides and lastly Top. . Unless you are using multi-layered edges which you want to be seen from the front it is advisable to lay the top or front of the picture last. By doing this the picture will overlap the edge veneer which will not then be viewed from the front. When preparing the back, ends, side and top ensure you have a slight overlap all round. This can be removed once the veneers have been glued in position. Before gluing or laying the picture down ensure that the baseboard is 'keyed'. This means scoring the surface with a rough piece of glasspaper. By doing this the glue will have a better surface to stick too. Once the surface has been `keyed' remove any dust that remains. What glue should be used? If you are lucky enough to have the use of a press, 'Cascamite' or one of the white wood glues are very good and provide an exceptional bond, otherwise it is advisable to use a contact adhesive like 'Thixofix'. It is worthwhile experimenting with different glues to find the one acceptable to you. I will suggest, though, that the beginner uses 'Thixofix' to start with. Please remember that the fumes can be quite toxic so use in a well ventilated room, shed or garage otherwise the smell will permeate the house. THE BACK If using 'Thixofix' firstly coat all surfaces of the baseboard and one side of the backing veneer. Do not coat too thickly, and allow to completely dry for at least 24 hours. During this time do not allow the surfaces to come together. The instructions on the tin state that the properties of the glue allow for repositioning. Don't you believe it! Once the surfaces come into contact with each other it is virtually impossible to separate them without using heat to melt the glue. Even applying heat will inevitably cause damage. If there are any glue lumps on the veneer or base board, clean them of before going any further otherwise they will show through the veneer. This first coat of glue acts as a sealer and stops the next coat from being absorbed by the wood. Don't apply glue to the borders and stringers yet. After 24 hours give the back of the base board and the backing veneer a second thin coat. Keep the glued side of the veneer uppermost and allow both to become touch dry. When touch dry place two laths of wood across the veneer, one no more than two inches from the top and the second about halfway down. These should be of sufficient thickness and distance apart to stop the veneer from touching the board when the two surfaces are brought together. Position the board on the laths and ensure that it is central. Bring the top edge into contact with the board. (remember, once the contact has been made, treat as permanently stuck.) Carefully invert the whole lot. Support the bottom of the veneer with one hand and remove the laths, top one first. Gently press the surfaces together starting from the top working from the middle to the sides until the veneer is completely stuck down. Then roll it completely flat using hard pressure with a wallpaper roller or cork block. This should remove any air trapped underneath the veneer. Any places that are not stuck properly will make a sort of 'tssk, tssk' noise. If you have a press, leave it pressed down overnight. Do not rush this process as it is essential that the work is firmly glued otherwise it may well start lifting in the future. Instead of wooden laths I have successfully used clear polythene or waxed paper pulling it downward as the surfaces come together..
Thanks again to Eric Horne for his input into these articles. More in the next issue including trimming and cleaning the back and laying the edges sides and top. The above page was published in October 1997 when Eric Horne was still an active member of the Redbridge Marquetry Group. He is sadly missed by us all at the RMG. Eric was a professional model maker in his working life and he often used to bring some of his models along to the pre Christmas group meetings, they were incredible master pieces, and what was even more amazing was that Eric made all the nuts and bolts used on these models himself. A very clever man was our Eric. Well we hope to be a little quicker with pasting the next issue of Marketing Marquetry on this site. I'm afraid that with all the additions we've been making to our web site we've tended to over look Marketing Marquetry, but after a little delay we've repaired that over sight. Thanks for your patience. |
|||||||||||||||||||||||||||||||
| Tutorials Menu | |||||||||||||||||||||||||||||||