|
The Marquetry Society from its humble beginnings |
|
Marquetry hasn't always been the popular
art form that it is today. Why, if you only go back to the
middle of the last century it wasn't really acknowledged as
anything that much pictorial at all, except in the form of
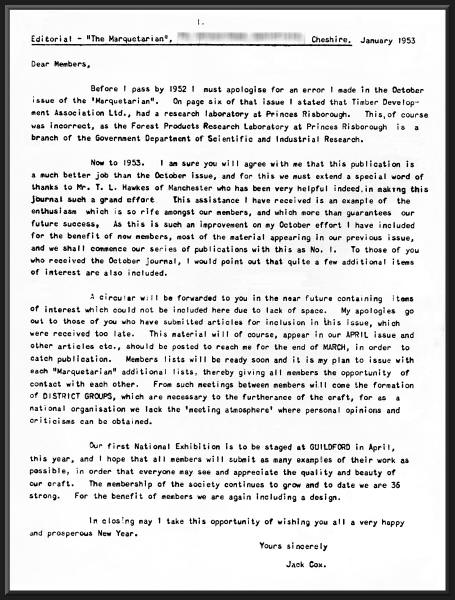
flowery and geometric furniture decoration. Well then, how did it all begin? It all started in 1952 with an innocent
question posed by a Mr Jack Cox who at the time was residing in
Dunkenfield, Cheshire. Mr Cox was gallantly "having a try" at
making some pictures in the then somewhat unknown medium of
marquetry. At the end of this newly formed Marquetry Society's first year they held the very first National Exhibition in the foyer of the Odeon cinema, Guildford. This first exhibition enjoyed an entry of 170 exhibits and was so successful that it was sent on a tour of the Odeon and Gaumont cinemas all over the country. The following
is an actual report of that first exhibition with a list of the
results from the winning classes:- |
||
|
||
|
After the exhibition closed at Guildford, it went on tour in September 1953 to the following locations: Kensington, Birmingham, Nottingham, Bristol, Leeds, Harrogate, Edinburgh, Manchester. The results
from the competition classes in that first National
Exhibition are as follows:- |
||
|
||
|
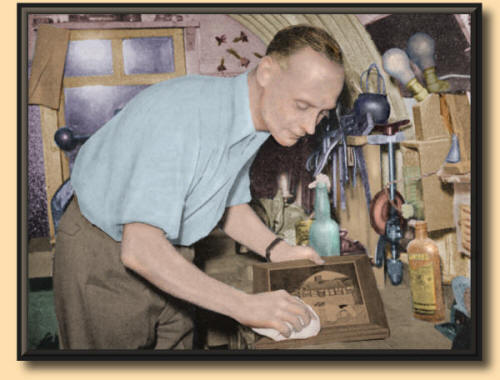
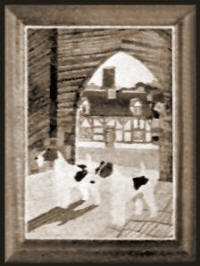
As you will have noted from the results table above, Mr. Cliff Penny (London) rather seemed to dominate that very first National Exhibition. Unfortunately, at the moment, we haven't yet been able to locate any photos of the actual exhibits (although a professional photographer was drafted in to record the event) but, we are trying our best to locate some copies of the photos if they still exist. However, for the time being we have found some photos of Cliff Penny's work, plus one of him working on one of the pictures. We hope you find them as fascinating as we do: |
||
 |
||
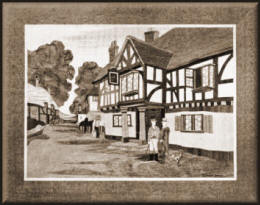 Above: Cliff's descriptive picture of a country pub Right: A pair of Airdales being obedient! |
 |
|
|
The above photos depict the work of the fellow who was the very
first winner of the Marquetry Society's National Exhibitions.
The standard of Cliff's work was of a high calibre and would
gain a high placing even today. As soon as we can locate some of those photos of the exhibits that were taken at that first Exhibition we will display them on this web site for you (I myself can't wait to see them!) so, for the time being we hope these examples of Cliff's work will suffice, and will give you a taster of the high quality of the work being produced in the early 1950's. |
||
|
The very first National Exhibition 1953 |
||
|
Every year the Marquetry Society holds a National Exhibition of
the finest marquetry pieces that it's members and associated
members have created from that most basic of materials, wood
veneer. The standards achieved these days are of such a high degree that it seems almost impossible to believe that they are produced from simple hand tools and materials, but they are! So, in the early days of that very first National Exhibition when they had no accepted standards to judge upon, how did they view the entries of that initial exhibition? to answer that question we are re-printing the report that Douglas Walters (one of the original members of the Society) wrote after attending the exhibition. Here is the report exactly as Douglas wrote it: |
||
| OUR FIRST EXHIBITION by Douglas Walters | ||
|
The foyer of the Odeon Cinema,
Guildford, is beautifully veneered in walnut, and it was against
this background that the entries for our first exhibition were
most advantageously displayed and most expertly judged. Those of our members who were able to visit the exhibition will, I am sure, agree that the standard of all the work submitted was exceptionally high, indeed this is amazingly substantiated by the fact that it took the judges two and a half hours to reach their decisions on the best entries shown. The classes under which the entries were displayed were very comprehensive and clearly indicated to the public, who prior to the exhibition on the whole were unaware that such a craft as Marquetry existed; what excellent results could be obtained by beginners, and how with practise, imagination and general good taste, these first attempts could pave the way to the production of what can only be called masterpieces, of which there were many on show. When the idea of an annual Exhibition was first discussed, it's possibilities were unlimited, but also unpredictable. It was impossible to estimate the number of exhibits we might get, but as I had already had the offer of the Odeon Cinema at Guildford, it was decided to go ahead. It was obvious that an absolute minimum of fifty entries would be essential in view of the size of the Cinema's foyer, and many anxious moments were experienced before that figure was reached and then - more than doubled. There can only be praise for all exhibiting members for their great interest and industry without which the exhibition could never have succeeded, and it is hoped that the final figure of 117 entries will prove an encouragement to all members who were unable to exhibit this year to rally round and double our success next time. Let me give you a brief picture, for the benefit of members who were unable to visit the exhibition, of it's setting and layout. The Cinema's spacious foyer, rectangular in shape was ideal for our purpose, approached by a broad flight of stairs and of necessity punctuated by various exit and entry doors, it nevertheless possessed ample hanging and table space. The walnut veneered walls were relieved by projecting horizontal bands of sycamore from which the pictures were hung, and the table exhibits were shown to advantage in the body of the foyer. These table exhibits consisted of stands lent by two prominent handicrafts firms and a local firm, showing marquetry materials; another table exhibit showed the step by step assembly of a piece of work from original drawing to the completed, polished and framed marquetry picture and the tools and materials required; and lastly but no means least, an exhibit deserves special mention in this report - it was made by a group of boys all under 15 years of age, who exhibited not only their very excellent completed pictures, but a most original display of home-made tools and examples of their exercises in cutting straight lines and curves - altogether an excellent effort. This then was our first exhibition, scheduled to run for a fortnight but by virtue of it's great appeal to the local public extended for a further week, and during this time seen by many thousands of people. During it's run a prominent member of the Odeon organisation, intrigued by the originality and popularity of the exhibition, paid it a visit, as a result of which a tour is being organised by him for the entire exhibition to visit Odeon and Gaumont cinemas in many parts of England. The tour is to commence in September which is the peak cinema season and will continue for a period of about six months. Details are now being worked our for the routing and transport of the exhibition, which of course needs very careful planning, but it has already been decided that the tour will commence in Kensington, London, and finish in Manchester. We are very grateful for this opportunity of showing such a large public the results of our labours and hope that it will attract many new members to the Society. The actual staging and "packing up" of the exhibition entailed a lot of hard work and I received most able and generous support from a gallant group of members who gave much of their valuable spare time to help in the "behind-the-scenes" tasks, and to whom I extend my thanks. It only remains for me to offer the most sincere thanks on behalf of the Society to the many people who gave this venture their support and assistance without which we should have been severely handicapped:- to Mr. Rowling, the Manager of the Odeon Cinema, Guildford (whom we are glad to welcome as the first Vice-President of the Society) for his kind offer of the foyer of his Cinema and for his untiring enthusiasm and energy displayed during the exhibition, to the three judges who gave such careful consideration and showed such a great interest in their onerous task - Dr. R. H. Graham-Pole, Mr. L. R. Garrett and Mr. R. W. Smoothey, to the Society members who very kindly made posters and advertisements for the exhibition, to Handicrafts Ltd., Fred Aldous Ltd., and James Rogerson Ltd for their excellent and most helpful exhibits; and finally to a number of local people who although in no way connected with the Society gave such willing and indispensable assistance in the form of transport, materials etc. We can justifiable say that we have been successful in this our first exhibition, and we can look forward with confidence, benefiting by our mistakes and shortcomings of this year, to ever greater success in the future. |
||
| ____________________________ | ||
|
We realise that this was a fairly long report with no illustrations, but we have included it exactly as it was printed in the "Marquetarian" at that time. There was a series of professionally taken photos made at that exhibition, and if we can manage to "lay our hands" on any of them, we will be extremely pleased to present them in these pages for you (and us!) to enjoy. It would be marvellous to be able to compare the levels of progress from those early days against the standards we achieve today - I just wonder what the pictures will look like in another fifty years time? I would bet that "hands on" texture will at last play a part - after all, a totally flat mirror like finish can easily be achieved by machinery and spray booths, but natural texture is a gift of nature and the appreciation of man's sympathy with nature - it is an intrinsic beauty that shouldn't be ignored. Anyway, I hope that those Marquetarians of yore would approve of the efforts produced today, I rather think they would be very proud of their offspring. The photo below shows the original Guildford Group in 1953: |
||
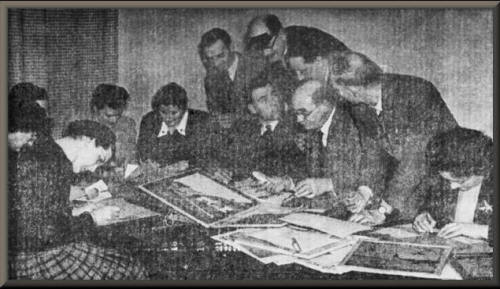 A section of the original Guildford Marquetry Group hard at work. They are:- Standing (left to right); Mr F. V. Pester, Dr R. M. Graham-Pole (Group Chairman), Mr D. K. Walters (Hon. Gen. Treasurer of the Society and Group Secretary), Mr R. F. Boxall Sitting (left to right); Miss W. Simmonds, Mr J. Airston, Miss S. M. Drake, Miss C. Dickie, Miss F. M. Merson, Mr C. Collier, Mr W. F. Marshall, Miss B. Brace.
____________________________
|
||
|
"Glues for Marquetry" by D. K. Walters. What glue shall
I use? How often have we asked ourselves that question! There are however certain glues for certain jobs, and to avoid disappointment in 'laying' a picture it is important to determine first (before deciding on any glue) :- a/. The method of laying the picture b/. What stresses, strains, heat etc., the finished article demands. Numerous ways of laying a marquetry panel have from time to time been published, but it is my experience that there is only one way which is really satisfactory namely by cauls. Briefly this method consists of placing the glued picture and baseboard between strong boards or cauls under pressure, the cauls being either heated or left cold, depending upon the glue.Next we must decide how the picture is to be used after completion. As a wall plaque or as a decoration on trays, table mats, fire-screens, table tops etc., in short, what special properties are required of the finished article. Having decided these two points we can now consider which types of glue will best fit in with our requirements. It is impossible of course to describe every type of glue on the market in an article of this size but the following are particularly suitable, covering most conditions and being fairly easily obtainable. UNIVERSAL COLD GLUE As sold in tins or tubes, ready for use without application of heat. This type is very suitable for laying marquetry pictures which require no special properties. It is easy to handle and is fairly slow drying, at least six hours cramping time is required and twenty four hours before the article is safe to work. This type of glue is normally non-staining but it is NOT heat or water resistant. Although a cold setting glue, it has the advantage that if a mistake is made or a bubble appears in the pressing it may be softened by the application of heat (a hot iron) and the blemishes removed. HOT ANIMAL GLUE A glue similar to the above but requiring to be heated before use. It is a fairly quick setting glue and consequently the cauls must be heated before the picture is pressed between them, this calls for some very quick work and the cauls must not chill before the pressure is applied. This can be a difficult glue to use for the home-worker with limited means of heating the cauls. The glue is very strong but again it is NOT heat or water resistant and due to its greater powers of penetration is liable to seep through open grained and porous veneers. CASIN GLUE. This glue is made from skimmed milk and is marketed as a light coloured powder. It is made up as required by the addition of water and is used cold. Casin glue is extremely strong and to a certain extent is heat proof and waterproof. It is however inclined to stain hardwoods and is therefore unsuitable for use with light coloured veneers and, although some makers market a non-staining variety, these are less water resistant. A further drawback is that once laid, nothing can be done to rectify any defect occurring to the pressing. SYNTHETIC RESIN GLUES. These are a modern development, and there are hot and cold
varieties but as the hot types require complicated apparatus and
are critical to handle we shall only discuss the cold types
here. The cold synthetic resin glues can be put into two
categories as follows:- Both these types give one of the strongest glues known and they are both heat and water resistant and normally non-staining (although some makes do stain hardwood). Drying time can be varied from very fast to very slow depending on the type of hardener (most makers market three ‘speeds’ of hardener). The fastest in my experience is one which is dry in twenty minutes pressing time – it must be remembered however that the faster the hardener, the less time you will have to get all your cramps done up on your cauls as setting commences immediately the two are brought into contact. There are however two drawbacks to this glue. Firstly of course, once pressed, no mistakes can afterwards be rectified. Secondly the shelf life of the syrup is only about three months although some makers now market it in powder form which keeps indefinitely. In a well pressed picture the glue holds perfectly, but if the joint is not really tight the glue is inclined to crazing or cracking, which of course develops a weak spot in the work. To counteract this a special form of this glue called “Gap filling” glue is now available and with this less pressure is needed. It is especially suitable for marquetry work as any small gaps (they appear in the best of work) between the edges of the various veneers are filled with this glue which is so pale a colour (care – at least one may give red glue lines) that when sanded and polished they are virtually unnoticeable. These glues are slightly more expensive than those described in items given above. In conclusion may I say, from my own experience that for a simple picture requiring no special properties use the COLD UNIVERSAL GLUE with cauls under cramps, for work requiring heat and water resistance such as tea trays, table tops etc., use a gap filling (synthetic resin), again using the cauls and cramps. Before using any glue or cement be sure to read the makers directions and follow them. Don’t FORGET that heat and water resistance can also be obtained and improved by certain methods of finishing and polishing, but there, that’s another articles….. Editor’s Note: Mr D. K. Walters,
XXXXXXXXXXXXXXXXX, Guildford, Surrey, states that he will supply
the names of various brands of glue if members requiring same
will write to him enclosing a stamped addressed envelope.
|
||
| ____________________________ | ||
| The Marquetarian Magazine | ||
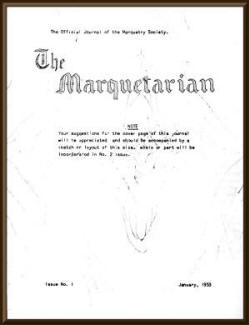 The very first issue in January 1953 |
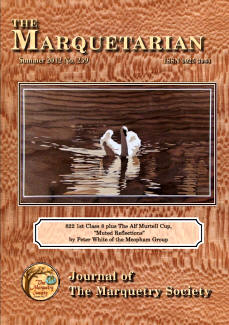 A recent issue in 2012 |
|
|
The Marquetarian
magazine is one of the essential
'king pins' of the Marquetry Society. The magazine, as you can see from the front cover of issue number 1 above, was first published just a few months after the formation of the Society itself. Before it became a magazine it was distributed as a series of "Roneo'd" sheets (or, a home produced type of news letter in other words) and it held no illustrations within it's pages, unlike today's professionally produced publication which you can see on the right above. There
were, however, some very interesting articles in that first
issue and we have taken this opportunity to reproduce a couple
of the items in these pages for you.
|
||
|
And now, last but not least for this short history of the beginning of the Marquetry Society, here is an article on Polishing taken from that earliest edition of our own magazine The Marquetarian: |
||
|
PERFECTION IN POLISHING We'll do it together ... I'll be at your elbow and we'll take it step by step. We'll never get a flat finish unless we make a flat start ... so let's use a toothing plane or teeth of a fine saw on the baseboard to get it flat and form a "key" for the glue. Use a special veneering glue like CALBAR. Why? What's that got to do with polishing? Quite a lot . . . In the old days, they used to "flatten" the veneers by coating them with glue size; this aided the glueing and polishing stages because when the veneers were first hammered, then ironed on with damp heat, the glue would be drawn right up into the veneer fibres forming a glue barrier and preventing grain filler "linkage" in polishing. Calbar, will give excellent absorption without penetration; will not stain delicate veneers; will re-heat if you get a blister and is fast setting. Also, if you take the picture out of the press after an hour, it will "cure" or harden off equally well outside the press! On removal from the press, leave the picture for a day to dry out. Then lightly damp the extra thin, double gummed special veneering tapes, and remove. Do not use a cork sanding block and Garnet paper yet! First of all, reduce all veneers to the same thickness and save a lot of hard rubbing (which may cause you to rub right through the softer veneers) by first of all working over the entire picture with a cabinet maker's scraper, deftly removing shavings from the thicker woods. Watch you don't dig in! Now you can see the importance of toothing the baseboard first. Now, using 4/0 and then 6/0 Garnet Polishing paper, wrapped around the cork sanding block, lightly render the surface smooth. Remember that abrasives actually impair the grain and figure of the wood, so remove all dust as it forms with a dry, clean cloth in firm strokes. Now watch it! Here comes trouble. If we were not making a marquetry picture we would actually dampen the panel down to deliberately raise the grain, then paper smooth and leave it overnight to dry before starting the finishing process. But with Marquetry, it is vitally important to work DRY at all times. Many veneers contain natural pigments which will immediately stain other veneers if moisture in any form is carried from one to the other. If you try to sandpaper across Bombay Rosewood or Rosa Peroba, and Obeche or Sycamore, you will rub red dust into the grain of the lighter woods. The moment any moisture comes in contact with that dust, you will ruin your picture, because the dust will turn to dye. So you see that you must completely seal the grain of every different veneer before we go any further. With a clean, dry cloth, briskly wipe the surface of the picture along the predominating grain direction to revive the grain lustre, lost by the light papering. Have a dry duster or dry brush or air line handy (the wrong end of a vacuum cleaner will do!) Now let us look at your polishes. What's this? Polish in tins? Of course, your polish may arrive through the post to you in tins for safety's sake, but immediately remove it and keep it in glass or earthenware. Otherwise it will probably turn a bad colour as chemical action takes place. For best results keep it in glass. Start with SEALACOTE sanding sealer. This is a cellulose lacquer with a plaster filler. Carefully brush over the border mount with the Sealer taking care not to touch the sky or any other part of the picture. A good tip is to use cotton wool to daub over the border with sealer, then discard the cotton wool. Do not use the same piece for the next veneer. After a few minutes, carefully seal the sky veneer, throw the wool away, and then with another piece, seal the next part of your picture and so on until every part has been sealed. Allow time to elapse between each part. An excellent tip is to seal the veneer even before you tape it into your picture! Now let us leave this until to-morrow, allowing the SEALACOTE to form a tough elastic skin over the veneer. When we return to the picture and examine it against a good light we may find that several parts of the picture reveal open grain. This must be filled. Mix a transparent paste WOODFILLER with a little white spirit, or turps substitute, into a thin paste. Then carefully brush over the veneers requiring to be sealed. In the case of dark or vivid coloured veneers, this may show up as white specks in which case we should mix a little oil colour to match the veneer being filled. After an hour this will set. Now with hessian or clean rag, rub this filler hard into the grain. The prior coat of SEALACOTE will prevent the surplus filler entering the grain of other veneers, and enable you to wipe the surface clean. Leave it overnight. Next day, we lightly paper the filled surface with 9/0 Garnet. (Remember that abrasives actually impair the grain causing slight fuzziness, so dust off and then wipe with fresh dry rag to revive). Now you can brush a coat of Sanding Sealer right across your picture, making a perfectly sealed surface. After four hours lightly paper with 9/0 and dust off. Now brush on 1 coat of LUSTASHINE and leave overnight. Let's have a chat about Lustashine. It's as well to know a bit about it. First of all, it's a Cellulose Lacquer and it works by depositing a cellulose film on the prepared base of SEALACOTE by the evaporation of the solvent. In fact, whether a lacquer is sprayed on, brushed on, or rubbed on by fad depends entirely on the type of solvent (thinners) used. As you know, in French polishing, the Shellac is lubricated to get it to flow, in the case of LUSTASHINE, no lubricant is used at all. You simply rub it on with a fad for best results and the friction generates the heat to evaporate the solvent and leave behind the Cellulose film. The beauty of LUSTASHINE is that it also contains the wonder chemical ingredient UVINUL 490. This forms a barrier against the penetration of ultra-violet light rays which are present in both natural and artificial light, and which cause the discolouration of your veneers by chemical action. The makers do not claim that UVINUL 490 protects all veneers. It doesn't. But those that it can protect it does. Anyway let's get on with it. We now "flat" the picture with grade 0000 wirewool in firm straight strokes in the predominating grain direction. Then "Pull-over" another coat, this time diluted with 50% LUSTASHINE THINNERS. This extra solvent enables slower evaporation and a greater bodying. Leave overnight, during which time the surface will harden. Now comes the big decision. Do you want a semi-matt finish which will not show room lighting and detract from the picture? Or do you want a brilliant gloss which only a beautifully finished panel dare boast? (A high gloss reveals all blemishes). Well, let's assume you want a high gloss anyway, after all you can practice on the back of the picture! Now the special LUSTASHINE BURNISHER is actually an abrasive! It works something like jeweller's rouge. It cuts minutely into the cellulose film, making it sparkle. Before putting BURNISHER anywhere near the picture, you must leave it at least two days. Then rub on the Burnisher, allow it to "frost" and then rub hard with a soft, clean duster for a brilliant gloss. It will remove all the tiny "fad" marks you left in the polish! Your picture is now stain and heat resistant (not heatproof). However, if you want the semi-matt finish ignore the Burnisher. After the two coats of Lustashine, dip 0000 grade wirewool in Clear White SILICONISED Wax polish, (which has water-repellent and anti-adherent qualities and low surface tension which enables a smooth easier spread) and work this in straight strokes across your picture. Dirt and dust will not cling to a siliconised surface, and any thumbmarks can be easily removed! |
||
| Tutorials Menu | ||