

|
Varnishing Tutorial by Horrie Pedder |
|
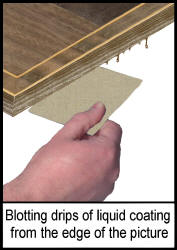
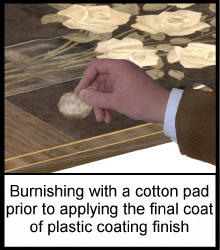
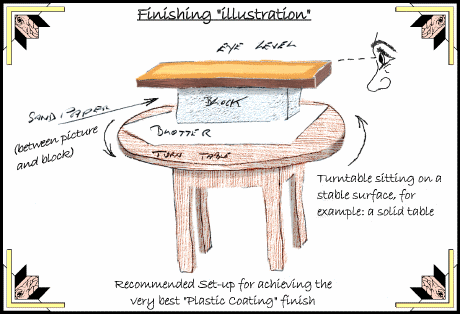
There is one very important thing to consider before you start applying your "finish" (or varnish) to your picture, and that is to make sure that you have given the glue you used when fixing your picture to the baseboard time to "cure" after you have taken your picture out of the press. I would recommend allowing a few weeks "curing" time for everything to settle. After the curing period has run it’s course, check the picture for any bubbles of air being trapped beneath your veneers, you do this by lightly tapping your picture all over the surface and listening for any ‘hollow’ sounds, which will indicate trapped air pockets. You get rid of these air pockets by making a little slit along the grain of the veneer with the point of your scalpel where you have found the trapped air pocket, and then you insert a little glue into the air pocket by applying the glue to a slightly lifted up edge of the slit (you do this carefully with your scalpel) you have cut in the veneer where the trapped air has been residing. Once you have applied the glue into the slit press the repaired air pocket flat with your finger and hold it there for a few seconds until the glue has "grabbed" and the veneer doesn’t ‘spring back’. Repeat this procedure until you have eradicated all the trapped air pockets from beneath your facing veneers and the baseboard. Once you have finished this process and checked that your picture is nicely flattened and sanded once again, you are then ready to begin the "finishing" (or varnishing) process. So now, please read on. I’ll convey the finishing process from here on in a tabular form so that it is easier to follow, so here we go: 1/. Lay the ‘sanded flat’ picture upon the ‘grit’ side of a sheet of sandpaper that has been placed on a levelled block (wood, large thick book, brick or what have you) and the whole assembly placed upon a large sheet of blotting paper that is in itself placed upon a turn-table (a cake decorators type of turn-table would be ideal for this purpose, see my accompanying illustration for guidance) Important Note: before moving on to the next step of actually applying the Plastic Coating, please read the safety warnings printed on the tin. Some coatings have a rather toxic nature and should only be applied in a very well ventilated room. Also, if you have any surplus coating left over, avoid storing it in your refrigerator even if it is sealed in a jar, because any odour escaping from the jar will contaminate the contents of your fridge. 2/. Once you have ensured that the surface of the picture is level by using a spirit level, then brush on "Rustins" plastic coating using a lightly applied "floating" action to avoid forming air bubbles. What I mean by floating action is applying the coating by more or less guiding the coating on with your brush rather than forcefully brushing it on with any degree of force, as such erroneous action could easily introduce air bubbles through the over strongly applied brushing effect. I would recommend using a decently sized very good quality brush, one where the bristles don’t fall out, for this operation. When you apply the coating only do it by using ONE stroke of the brush, don’t be swayed by the temptation to go back over the application of coating until it has surface dried, no matter how patchy it looks just leave it, now do the next stroke of the coating brush in parallel with the previous application and carry on until you’ve covered the surface of the picture. 3/. Using a scrap piece of blotting paper, remove any drips of the ‘still liquid’ coating that has been collecting under the edges of the picture. 4/. Now allow 20 to 30 minutes for the coating to touch dry before you apply the second coat using the aforementioned method. 5/. Apply your third coat as above following the instructions given in steps 2 to step 4, leaving out the "levelling" of the picture because you have already completed that step. 6/. When the third coat is touch dry (give it an hour or two depending on the weather and temperature) turn the picture over, check it’s still level with your spirit level, then coat the reverse of the picture using precisely the same methods you’ve already used for the face of the picture. You will now have three coats on the front and three coats on the reverse of the picture, and if you haven’t over applied too much coating, six thin layers of coating on the sides. If you preferred to, you could wipe off any of the coating that gets on to the sides of the picture with some blotting paper at the time you are applying the coating to the front and rear faces of the actual picture. You may then do the 'varnishing' of the sides separately by utilising the methods you’ve already used when doing the main faces of the picture. The choice is yours. 7/. Now allow the ‘varnish’ coating to dry for a few days or so, then rub the varnished picture flat by using 800 grade wet and dry papers (with a block) by only using light pressure to avoid scratching the surface. Use the sanding sequence of front, back, then sides. Once you have got the picture flat with no visible "dents" in the finish, you can use some burnishing cream to achieve a smooth surface. 8/. Once you have achieved the smooth surface make up some more plastic coating solution and this time add a little plastic coating thinners to the mix to make the final applications of coating flow easier, and then follow the aforementioned procedures to apply the coating. 9/. The extremely important ‘secret’ with making use of these methods so as to achieve a perfect finish, is in the burnishing of the surface after the first three applications of the coating, this burnishing allows the final thinned coats to find their own level and because of this you will achieve a very high quality of finish to your picture. 10/. If you find it necessary you can do some final
finishing and flattening by using some 1200 grade wet
and dry papers (wet of course) and then do some final
burnishing with the supplied cream followed by some
light buffing. If you require a matt finish use some
0000 grade wire wool lightly applied to the finished
picture until you achieve the level of matt-ness you
require. Best wishes with your picture finishing, Horrie. |
|
 |
 |
 |
|
| Tutorials Menu | |