

|
Taking
care of your cutting blade by David Walker |
|
When I first started doing Marquetry in 1981, I started with a kit as do many other folk. The instructions given were really minimal and although my first picture from a box whetted my appetite I was disappointed with the result. I found it increasingly difficult to cut veneer without splitting it and I was wasting more veneer than I had. In fact I ran out of veneer because the manufacturers of the boxes only put into the kit enough to complete the picture. They didn’t think about the absolute beginner who split veneer and finally ran out. It wasn’t until I joined Redbridge Marquetry Group that I realised what I was doing wrong. In fact if I had thought it through I would have realised quite quickly – my cutting blade had either blunted or tipped at the point (snapped off) I recently came across a member who complained that he was using too many blades. When I asked him what he did when the blade became blunt or damaged he said that he replaced it. I asked him why he replaced it rather than sharpened it and he said that he didn’t know that the blades we use could be sharpened because no one had shown him! Shame on his instructors. So here are a few tips that should help you cut veneer without splitting it. |
|
Professional veneer preparers tend not to use scalpels and
scalpel blades. They prefer to use their own tools, more often
than not a steel hacksaw blade with the teeth ground off
fashioned into a knife shape and honed on a stone into a razor
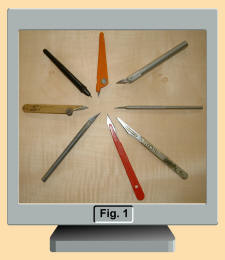
sharp cutting edge. Marquetarians more often than not do not posses the skill to sharpen hacksaw blades to an acceptable edge and so use a variety of different knives and scalpels. I would not promote one above the other; each has both advantages and disadvantages. It really all boils down to personal choice and what works best for you. Here are a few of the knives that I possess. Fig.1. My favourite is the brass handled one. Blades come in different shapes and sizes but I prefer the E11 hollow ground one which gives a very fine cut. I tend to advise beginners not to go for the hollow ground blade as it is very susceptible to tipping. They do not like the undue pressure that beginners tend to exert. The normal E11 blade is a good starter and if you cannot obtain some at your club they can usually be bought at a good class stationers or art shop. |
 |
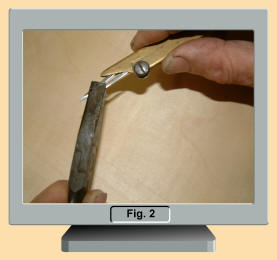 |
The first lesson with blades is to warn the beginner that a scalpel blade is extremely sharp. I normally show them the scar on the middle finger of my left hand which ‘got in the way’ of my scalpel blade early in my Marquetry career! I was using a steel rule to cut a straight line when the blade hit a knot in the wood, jumped up, across the steel rule across the finger nail and down my finger to the first knuckle. The amazing thing was that it didn’t hurt - for about three seconds! I must say that ‘once bitten, twice shy’. I always remember that when I am using a steel rule to cut a long straight edge. So beware of the blade, it is super sharp. The next lesson is how to insert the blade in the holder. Again, make sure that the blade is not held with the edge between thumb and finger. I keep a small pair of pliers with which I grasp the blade and slide it into the holder Fig 2. |
|
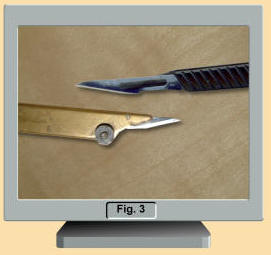
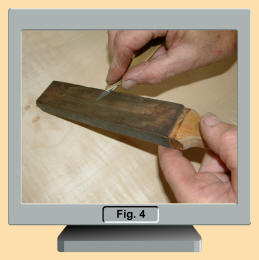
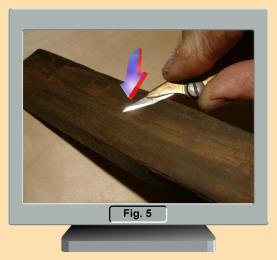
I prefer to have a large proportion of the blade free of the holder but not so much that it bends when cutting. Beginners find that a blade pushed further into the holder will ensure that the tip will not snap so easily. Ensure that the tightening nut or device is screwed up very tightly so that the blade will not move in the holder. Fig 3 ► A new E11 blade properly secured and used without undue pressure will last for a long time. I then strop the blade on a piece of leather to give it an extra keenness. Fig 4. ▼ Once this has been done you can see a bright edge appearing on the already sharp blade. Fig 5. ▼ |
 |
 |
 |
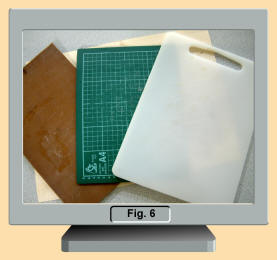 |
Another tip is to ensure that you have a soft cutting board. One that will allow the blade to sink in once the veneer has been cut through. There are a number of cutting boards available from art, craft and hobby shops. Fig 6 These are self sealing but are rather expensive. The brown board is a piece of soft ‘Lino’ mounted on a piece of plywood. For the last seven years I have been using a self sealing kitchen poly-something cutting board bought from one of the large supermarkets from the hardware section. This has seen a lot of service and is still flat, cuts have sealed up and my blade is not damaged. Again it is a matter of preference but it is unwise to use plywood or anything similar as this will damage the blade in a very short space of time. Occasionally, because of a build up of glue, my board needs to be cleaned off to keep it flat, as you risk splitting veneer on an undulating surface. This can simply be done with a scraper. |
|
The next lesson arises when the blade either becomes blunt or
‘tips’ (that is the point breaks off) due to the blade normally
being twisted in the cutting process. Fig 7 At this stage the
blade needs to be sharpened as you cannot do Marquetry with a
blunt or broken blade. Although broken at the tip the cutting
edge remains sharp along the length, so if the back of the blade
is ground down on a sharpening stone to renew the point, the
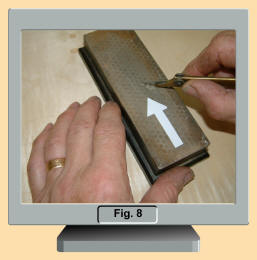
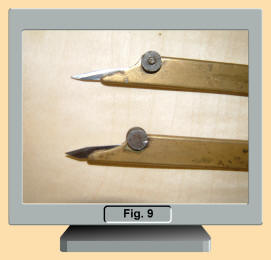
blade becomes as good as new. To achieve this, secure your sharpening stone in a vice to prevent it moving and dependent on the type of stone lubricate with oil, water or a special sharpening fluid. Turn the knife onto its back so that the cutting edge is uppermost. Maintaining a firm pressure push the knife along the stone’s surface at an angle of about 45° keeping the tip at an angle of about 60°.Fig 8 The objective being to grind the back of the blade down until the point is renewed trying to keep the tip at the same oblique angle as it was prior to being damaged. Only push the knife forward then lift it up and repeat the process. Once the desired tip has been achieved use the leather strop to renew the keenness of the blade. Fig 4 The blade will end up a millimetre or so shorter and may have to be repositioned in the handle but it will be as sharp as a new blade. Fig 9 This action can be repeated right along the blade until it becomes too short to manage properly. Use this method as well to re-sharpen an undamaged blade that has become blunt. And now a last, and indeed, a very important point to make when it comes to "taking care of your blade" is to ensure that every time, before you proceed to cut, you "dip the tip" of your blade in a piece of wax in order to lubricate it and thus prolong it's cutting qualities. This "waxing of the cutting tip" also has the benefit of easing the cutting difficulties found with some of the more recalcitrant veneers. Once again pay extreme attention to your fingers whilst sharpening and then again whilst using a steel rule or straight edge as the blade will always win. |
|
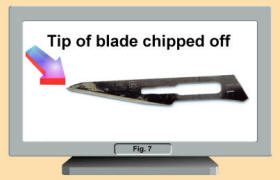 Fig
7 Fig
7Showing how easy it is to break the cutting tip from the blade. Care needs to be taken to avoid this problem |
 |
 |
We have to give thanks once again to our resident master of all matters marquetry David Walker for this extremely useful article on sharpening scalpel blades. I for one, never managed to sharpen blades successfully, but with Dave's article, I think I may stand a chance of at last getting a keen edge on my blades. I think I must have been the chap Dave mentioned at the beginning of this article who kept changing blades instead of sharpening them! Oh well, I've no excuses now for not keeping a sharp cutting blade. I wonder if I can sharpen up my razor blades as well and save myself a few bob? |
| Tutorials Menu | |