RMG Shield logo Redbridge Group Header Logo RMG Shield logo
Mounting a 
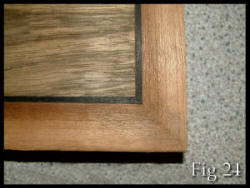
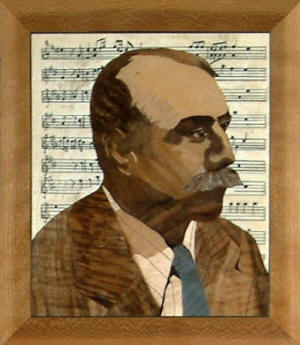
picture, affixing stringers, borders and cutting mitres Part III
by David Walker

Attaching borders and cutting mitres

(The figures for the next tasks have been carried out on a different picture)

Position a border along one side of the picture and another along an end, overlapping where they meet at the corner and secure with adhesive tape along the picture edge.

Repeat for the other side and end so that all four borders are secured in place. Place a piece of wood of the same depth underneath where the borders overlap. This piece prevents the edges of the mitre from splitting. (Fig 19). Place a straightedge along the pencil line that has been drawn on the veneer tape on the picture.

Because this pencil line extends through the corner of the picture to the corner of the baseboard we can now cut from the corner of the picture through the stringer to the edge of the border (Fig 20). My first cut is always towards the picture taking care not to mark the picture face. If going from the picture to the border edge you run the risk of splitting the veneer as the knife reaches the edge even with the piece of wood underneath.

Use a number of light knife passes to cut through both borders. Remove the waste from the mitres (Fig 21). Apply PVA glue under all the borders, press down the mitres securing them with a piece of adhesive tape to prevent movement (Fig 22). Place the picture in the press.

Fig 19 Fig 20
Fig 21 Fig 22

Once all four mitres have been dried, rub some PVA glue along the joint between the stringer and picture and rub with a flat implement
(such as the back of a spoon or knife handle to ensure a close joint).

When this has dried, turn the picture over and remove the waste from the border taking care not to undercut and finish by sanding with glass paper and a cork block (Fig 23)

Fig 23
Fig 24

A finished mitre (Fig 24)

As mentioned at the start of this article, this is the way in which I carry out these tasks.

They have been developed and adapted from the work of others and should not be considered the definitive method

Thanks for a terrific demonstration there Dave.

To prove the effectiveness of Dave's methods we include a photo of Dave's finished portrait of Sir Edward Elgar which was the picture featured in this tutorial.

As you will see, the mitres and stringers are beautifully clean and accurate and complement the portrait perfectly.

We hope you have found Dave's demonstration extremely helpful with your finishing stages of your marquetry pictures.

Daves Elgar portrait

< Previous Page

Learn with Redbridge Marquetry Group Page: 1 | 2 | 3 | 4 | 5 | 6